22 November, 2017

How to Speed up Windows 7, 8, 8.1, 10

Windows 7 build 7600
Windows 7 build 7600 (Photo credit: Wikipedia)
22-Nov-2017


In Windows 7, 8, 8.1, 10, slow performance is one big hurdle to tackle.

Aside from simply increasing the RAM to max, if that is possible, and switching to SSD, if that is at all possible (financially, of course), there is the usual list:


  • uninstall unneeded software
  • clean up computer clutter
  • disable services not in use
  • delay start up for some services
  • and many, many others


What I am writing about now is not these usual stuffs, but one that is normally overlooked, or not done: Windows File Indexing.

A bit on File Indexing. It is to aid searches. Google it to know more, but this is taxing Windows far beyond belief. Right after Windows install, there already is a ton of files in your C: drive. And this feature is turned on by default. So if you have several discs (desktop, in particular), or partitions, then all of these partitions have the file indexing flag turned on.

And every time you add or remove a file in any of these drives, file indexing kicks in, for what? Again, to aid file searches. Even more, to check what is inside the file, so when you do your searches, file name and file content is checked.

Let your imagination now run wild. How much system resource will that consume? Sorry, but I can't compute!

So let's get it done with.

Simply, to check on it, right-click on a drive, like C:, or D:, or whatever you have, except of course CD drive and the likes excluded, and at the bottom is Properties. Click on it.

Then, again, at the bottom part, you will see 2 checkboxes. First is 'Compress...', and next is 'Allow files on this drive to have contents indexed in addition to file properties.'

So was wrong. Not only file name and contents are indexed, but file properties is also indexed. Wham!

Well, to turn that off means all of those indexing activities will immediately cease. And all you have to do is uncheck that box, Yes, that is all. Right away. Immediately.

Sudden, instant, immediate effect. And do it for all disc drives that you have. I'm sure you will right away feel the difference.

I mean, why would Windows have that feature turned on by default, and without a hint, it is taking a lot of system resources?

Now this is the kind of 'improvement' that I would recommend to anybody and everybody, without having to fork out a single cent.

Of course, if you need to do searches, then leave it on, and forever be plagued by a slow Windows PC.

Wait, you mean there is no help? If I want to turn off File Indexing and I do searches, then I'm done for good? Actually, there is. You are not the first to ask that question. And for sure, you will not be the last.

There is a free tool, Search Everything, that you can use to help you in doing file searches, and it is customizable, too. So go ahead and turn off File Indexing to get that added speed (or conversely, remove that Windows slowness), and since Windows will not be able to help you anymore with searches, use Search Everything, a free tool from voidtools.com.

So now you have a way to make your PC a bit faster without forking out a single cent, and you also have a new tool to use for file searches.

Who says you can't have the best of both worlds?

Now you can.

Till then!

20 September, 2017

Kaspersky Lab Endpoint Security 10.3

Kaspersky Lab
Kaspersky Lab (Photo credit: Wikipedia)
20-September-2017


Our AVG Business Edition antivirus is expiring in a week's time. Kaspersky is being eyed as the option. So I was asked to do reviews and evaluation.

Now, AVG is okay, so far. But there is a more stringent and more complex implementation for one of our customers. We deal with building management systems, and nowadays, customers do not want to be talking to 2 vendors. So instead of having the BMS company and the Intelligent System provider as separate packages, BMS now takes under its umbrella the Intelligent System. This brings into the scope of the BMs company the task to choose and coordinate with whoever will be the IS vendor.

According to av-test.com, there are 5 antivirus products that garnered all full marks for protection, performance and usability. In no particular order, these are Kaspersky Lab Endpoint Security 10.3, Kaspersky Lab Small Office Security 5, Symantec Endpoint Protection 14.0, Symantec Endpoint Protection Cloud 22.9 and Trend Micro Office Scan 12.0.

That data is coming from their report The best antivirus software for Windows Client Business User.

Now I found out that av-test.com is a 'paid' review, which means that if you want to be reviewed, you pay. So I looked for another antivirus review company that is independent.

I found AV-Comparatives.

And you can check for your their August 2017 Report. Kaspersky has some sort of compromised moments. But that is not all.

Kaspersky has KICS, the product we are just looking for. Aside from doing the mechanical and electrical parts good, we need to protect the control system from hacks.

So I won't be telling more now. We chose Kaspersky Endpoint Security 10.3 for our company's antivirus and real-time protection, and on top of that, we are engaging Kaspersky for their KICS.

Today is the first day that we are rolling out our 3-year package to each PC and we have about 2 weeks to complete the task. Hopefully, we can manage the task quite well, and that Kaspersky AV lives up to its name.

Till then!


06 September, 2017

Singleton: Create A Single-Instance Application

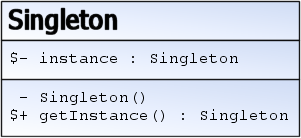
UML class diagram of the singleton design pattern
UML class diagram of the singleton design pattern (Photo credit: Wikipedia)
06-September-2017


Create a single-instance application. That was the objective I thought of lately on one small program I am creating. That is due to some database update needed. So no double-update or better yet, multiple updates, must happen.

Okay. It was actually simple, but here I will just outline the simple steps - again, for my own use when I need it in the future - and also for anybody else who might need to implement this same feature in their programs.

So how do you create a single-instance application? How to enforce a singleton pattern?

It is very easy. Just look at the code snippet below. And this is using Mutex in the Program section where your code execution starts.


internal static class Program {
private static Mutex mutex = new Mutex(true, "{a381c74c-c9a1-4716-beff-e8a08e964462}");

[STAThread]
private static void Main() {
if (mutex.WaitOne(TimeSpan.Zero, true)) {
Application.EnableVisualStyles();
Application.SetCompatibleTextRenderingDefault(false);
Application.Run(new MainForm());
mutex.ReleaseMutex();
}
else {
MessageBox.Show("Only one instance allowed.");
}
}
}


So that is the baseline requirement to satisfy a singleton pattern. And if you are wondering the seemingly cryptic string in the Mutex declaration, fret not. It is just a string that Mutex implementation requires, so it can be anything, like the name of your application, but it must be unique.

Alright, if you insist on using the same seemingly cryptic alphanumeric combination so it is unique, then add these 2 lines somewhere in the form load event, and just capture that value, and put it in the Mutex declaration. And comment those 2 lines right away as they are no longer needed.


var guiId = System.Guid.NewGuid();
MessageBox.Show("guiId");


Yes, that's how I got mine.

Now there is an additional feature that can be included, and not just simply throwing a message box. The thing is, why not bring up the instance of the running application instead?

Well, that is possible.

Modify the Program section as per below code, which means disabling the message box and replacing it with some nifty Win32 function (API). It is sending a message to all other running applications, but since it is unique only to this application, then it is understood only by this same application, so only this particular program will respond. Mind-boggling, isn't it?

Let's get done with it then!


internal static class Program {
private static Mutex mutex = new Mutex(true, "{a381c74c-c9a1-4716-beff-e8a08e964462}");

[STAThread]
private static void Main() {
if (mutex.WaitOne(TimeSpan.Zero, true)) {
Application.EnableVisualStyles();
Application.SetCompatibleTextRenderingDefault(false);
Application.Run(new MainForm());
mutex.ReleaseMutex();
}
else {
// MessageBox.Show("Only one instance allowed.");
// send our Win32 message to make the currently running instance
// jump on top of all the other windows
NativeMethods.PostMessage((IntPtr)NativeMethods.HWND_BROADCAST,
NativeMethods.WM_SHOWME, IntPtr.Zero, IntPtr.Zero);
}
}
}


As for NativeMethods.cs, you need to create a new class for that.


internal class NativeMethods {
public const int HWND_BROADCAST = 0xffff;
public static readonly int WM_SHOWME = RegisterWindowMessage("WM_SHOWME");

[DllImport("user32")]
public static extern bool PostMessage(IntPtr hwnd, int msg, IntPtr wparam, IntPtr lparam);

[DllImport("user32")]
public static extern int RegisterWindowMessage(string message);
}


Then, to complete the code, add two procedures after the Main Form's call to InitializeComponent.


public MainForm() {
InitializeComponent();
}

protected override void WndProc(ref Message m) {
if (m.Msg == NativeMethods.WM_SHOWME) {
ShowMe();
}
base.WndProc(ref m);
}

private void ShowMe() {
Show();
if (WindowState == FormWindowState.Minimized) { WindowState = FormWindowState.Normal; }
// get our current "TopMost" value (ours will always be false though)
var top = TopMost;
// make our form jump to the top of everything
TopMost = true;
// set it back to whatever it was
TopMost = top;
}


Now this is all that it takes to create a singleton implementation of a program. This is written in C#, so feel free to adapt this to other languages as you deem fit.


Sources

I am simply blogging on this singleton implementation, on how to create a single-instance application, but the source articles are here and here, thanks to the authors! Read on these 2 articles to get more explanations, and other suggestions, too.


Until then, happy coding!


24 August, 2017

Minimize An App to System Tray

24-Aug-2017


I am writing a small WinForms program, and I thought of including minimize an app to system tray feature. Since this is the first time I will do this, I just did a search in Google. I am very sure many have done it as it already is a common feature.

Well, common for everybody else, but at this point, not me. Not yet.

Thus, I searched for ‘minimize an app to system tray’, and I did find valuable articles, many in Q&A forums, like StackOverflow.com.

I’ll go directly to the point now. What is required to make it happen?

1. Handle the form’s resize event.
2. Make a NotifyIcon click event restore the form back.

Here’s how it’s done.


Handle the Form’s Resize Event

Select the form and on its Events, declare this:

private void MyForm_Resize(object sender, EventArgs e) {
    if (FormWindowState.Minimized == this.WindowState) {
       myNotifyIcon.Visible = true;
       myNotifyIcon.ShowBalloonTip(500);
       this.Hide();
    }
    else if (FormWindowState.Normal == this.WindowState) {
       myNotifyIcon.Visible = false;
    }
}


Make a NotifyIcon Click Event Restore the Form Back

Add a NotifyIcon tool, and on its click event, declare this:

private void myNotifyIcon_Click(object sender, EventArgs e) {
    this.Show();
    this.WindowState = FormWindowState.Normal;
}


This is all that is required, really. But sometimes it doesn’t work. One small trick is needed.

Add an Icon to the NotifyIcon tool.

myNotifyIcon.Icon = SystemIcons.Application;

Also, you can add in the Text and Tip properties:

myNotifyIcon.BalloonTipText = "App is minimized to System Tray.";

myNotifyIcon.BalloonTipTitle = "My App Name";


Sometimes, you will see articles that suggest using the Form’s Visible property. But this is also known to still make the app appear or selectable (although not visible) when you do Alt + Tab. So stick to Hide() and Show() events. Still your choice, though.

Okay. I’ll stop here, cause that’s all that is really needed to minimize an app to system tray. Easy, right?

Happy coding!

09 August, 2017

Is ScanGuard Safe? Suggested After Windows 10 Creators Update?

Microsoft Security Essentials
Microsoft Security Essentials (Photo credit: Wikipedia)
09-Aug-2017


Today I run Windows 10 Creators Update. One of the first articles that are listed in Microsoft Edge is the supposedly 'a must' ScanGuard installation - to protect your PC.

I am not sure if this is the first time I hear or read about ScanGuard antivirus, so I did a quick search.

Surprise, surprise!

About a year ago, many people threw all kinds of negative comments on this product, many veered away without even touching it, and many to tried it anyway, ended up uninstalling it. Reason? Creates thousands of false positive alarms!

It was not a good antivirus product and the company who made it, well, is new. Not yet established in the playing field.

What's the suggestion then? Use Microsoft Security Essentials, or Windows Defender. Or Malwarebytes. Even the free version of MBAM will do. Personally, I use Malwarebytes, and I'm sticking with it. And long years before, I did use Windows Defender and was contented with it.

So why would Windows endorse such a kind of product? I wouldn't know.

But for now, I will be waiting and on the lookout for fresh developments. One year and there should be much progress, who knows?

I guess those who have anything to say, well, all are welcome to leave their comments here, thank you!

Till then!